
Getting Started
Bulk Price Editor for WooCommerce lets you update prices for unlimited products in one action. Filter the products you want to change, choose how to adjust their prices, preview the result, and apply the update — the plugin processes everything safely in the background, keeps a snapshot of the previous prices, and lets you revert the whole update in one click.
Requirements
- WordPress 6.2 or higher
- WooCommerce 7.1 or higher (tested up to the latest release)
- PHP 7.4 or higher
WooCommerce must be installed and active — the plugin will show a notice and stay inactive without it. The plugin is fully compatible with HPOS (High-Performance Order Storage), the block-based cart & checkout, and the new product editor.
Installation
- From the WooCommerce marketplace: purchase the plugin on woocommerce.com and install it via your WooCommerce.com subscription, or download the ZIP and upload it under Plugins → Add New → Upload Plugin.
- Free community version: install it directly from Plugins → Add New by searching for “Bulk Price Editor for WooCommerce”, or download it from wordpress.org. Some features — scheduling, automatic revert, one-click revert, sale dates, and several filters and modifiers — are part of the premium plan; the free version shows an upgrade note where they apply.
- Activate the plugin. No configuration is needed — it is ready to use immediately.
Opening the editor
Go to WooCommerce → Bulk Price Editor in your WordPress admin. The page is available to administrators (users with the manage_options capability); developers can grant it to other roles with the bulk_price_editor/capability filter. The page has four tabs: Editor, Scheduled, History, and Settings.
How It Works
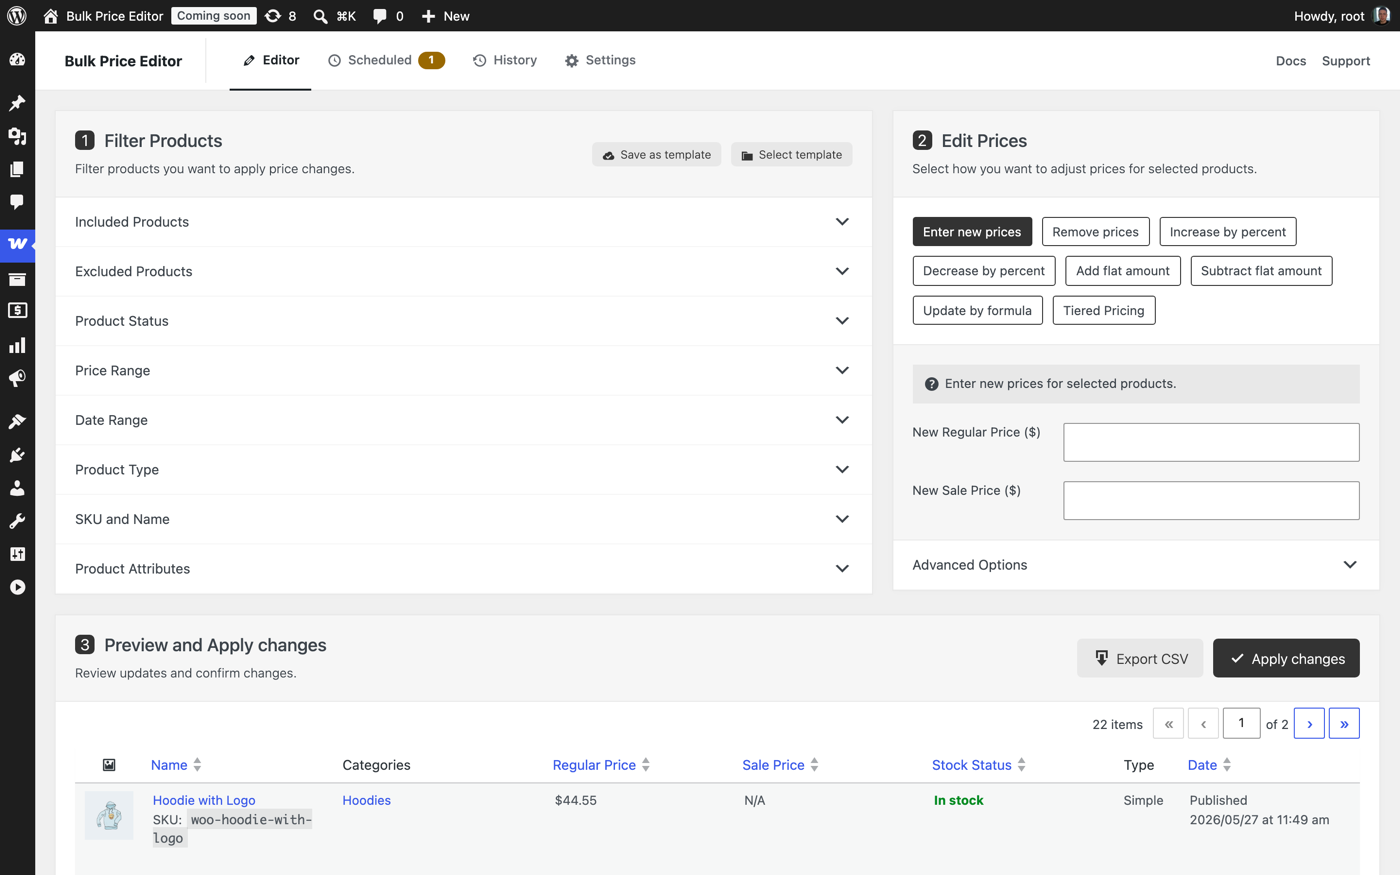
The editor is organized into three numbered widgets that mirror the workflow:
- Filter Products — select which products the update should affect.
- Edit Prices — choose the price modification method and enter the values.
- Preview and Apply changes — review the upcoming changes in the products table, then confirm.
The preview table refreshes automatically every time you change a filter or a price value, showing each product’s current price and the new price side by side (old → new, with the new value highlighted). When everything looks right, click Apply changes and confirm — now, or at a scheduled time.
Every update can be reverted. Before prices change, the plugin stores each product’s previous prices. If an update turns out wrong, open the History tab and click Revert. Reviewing the preview is still the fastest way to get it right the first time.
Step 1: Filter Products
Filters are collapsible sections in the first widget. All active filters are combined — a product must match every filter you set to be included in the update. Sections that contain a value stay open automatically.
Included Products
Search and pick specific products, product categories, brands, tags, and shipping classes to include.
- Selecting a category or a parent brand also includes all of its children.
- Selecting a variable product includes the parent and all of its variations.
- Category, brand, tag, and shipping-class selections match variations through their parent product, so the variations of a matching variable product are always included.
- Selecting products and categories together includes both: the chosen products plus everything in the chosen categories.
- Individual variations can be selected directly in the product search.
Excluded Products
The mirror of the previous section: any products, categories, brands, tags, or shipping classes you select here are removed from the result, even if they match the other filters. Exclusions win over inclusions, and excluding a category also excludes the variations of its variable products.
Product Status
Three quick status filters in one section:
- Stock status — Any (default), In stock, Out of stock, or On backorder.
- Sale status — limit the update to products currently on sale, or to products not on sale. Uses WooCommerce’s own on-sale definition, so scheduled sales are respected.
- Featured — featured products only, or everything except them. Variations of a featured variable product count as featured.
Price Range
Limit the update to products whose price falls between a minimum and a maximum — either bound can be left empty. Choose whether the range applies to the regular price or the sale price; in sale mode, products without a sale price never match. Variations are matched by their own prices.
Date Range
Filter products by when they were added to the store or last modified. Pick Date added or Date modified, then set From and To dates — either can be left empty for an open-ended range. Handy for repricing new arrivals or refreshing products that have not been touched in a while.
Product Type
Choose which product types are affected: Simple product, Variable product, Product variation, and External product.
By default Simple, Variation and External are checked — variations are listed as individual rows so you can see and adjust each variation’s own price. See Variable Products and Variations for details.
SKU and Name
- SKU contains — partial SKU match; enter the full SKU to match one exact product.
- Product name contains — matches products whose title contains the entered text (the text is matched literally, so
%and_are just characters).
Product Attributes
One search field appears for every global product attribute in your store (e.g. Color, Size). Pick attribute terms to narrow the selection; conditions from different attributes are combined with AND.
Step 2: Edit Prices
The second widget offers several price modification methods as tabs. Only the active tab is applied. Every method has separate fields for the regular price and the sale price — leave a field empty to keep that price untouched. A value of 0 is a valid price.
Enter new prices
Replace prices with exact values. Enter a new regular price and/or a new sale price; the same value is applied to every selected product. To give each product its own calculated value — for example a sale price derived from its regular price — use Update by formula instead.
Remove prices
Clear prices entirely. Choose what to remove: both regular and sale prices, regular price only, or sale price only. Removing the sale price is the quickest way to end a store-wide promotion.
Increase by percent / Decrease by percent
Adjust existing prices by a percentage (for example, increase all regular prices by 10%). Decreases never go below zero. Products that do not have the corresponding price are skipped — e.g. a percentage change to sale prices only affects products that already have a sale price.
Add flat amount / Subtract flat amount
Add or subtract a fixed amount from existing prices (for example, add $5.00 to every regular price). Subtraction never goes below zero, and products without the corresponding price are skipped.
Update by formula
Calculate new prices from each product’s own current values. Each field accepts a plain number or a formula; the formula is evaluated per product, so every product gets its own result. For example, entering {regular_price} * 0.8 in the sale price field sets each sale price to 80% of that product’s regular price — including products that had no sale price before.
Available variables:
{regular_price}— the product’s current regular price{sale_price}— the current sale price{price}— the current active price (sale price when on sale, regular otherwise){cost}— the product cost from WooCommerce Cost of Goods (WooCommerce 9.5+) or the Cost of Goods plugins by SkyVerge and WPFactory
Formulas support + - * /, parentheses, and the min() / max() functions for price floors and caps:
{regular_price} * 0.8— sale price at 80% of regular (a 20% discount){cost} * 1.4— cost-plus pricing with a 40% markupmax({regular_price} * 0.7, 9.99)— 30% off, but never below 9.99min({regular_price} + 5, 199)— add 5, capped at 199
A field left empty keeps that price unchanged. A product that is missing a value used in the formula (for example, {cost} on a product without cost data, or {sale_price} on a product without one) is skipped for that field — its price stays as it was. Anything that is not a valid formula is ignored rather than applied.
For developers: additional variables can be registered through the bulk_price_editor/formula/variables filter.
Advanced Options — Rounding and Sale dates
Every price method has the same two options under Advanced Options:
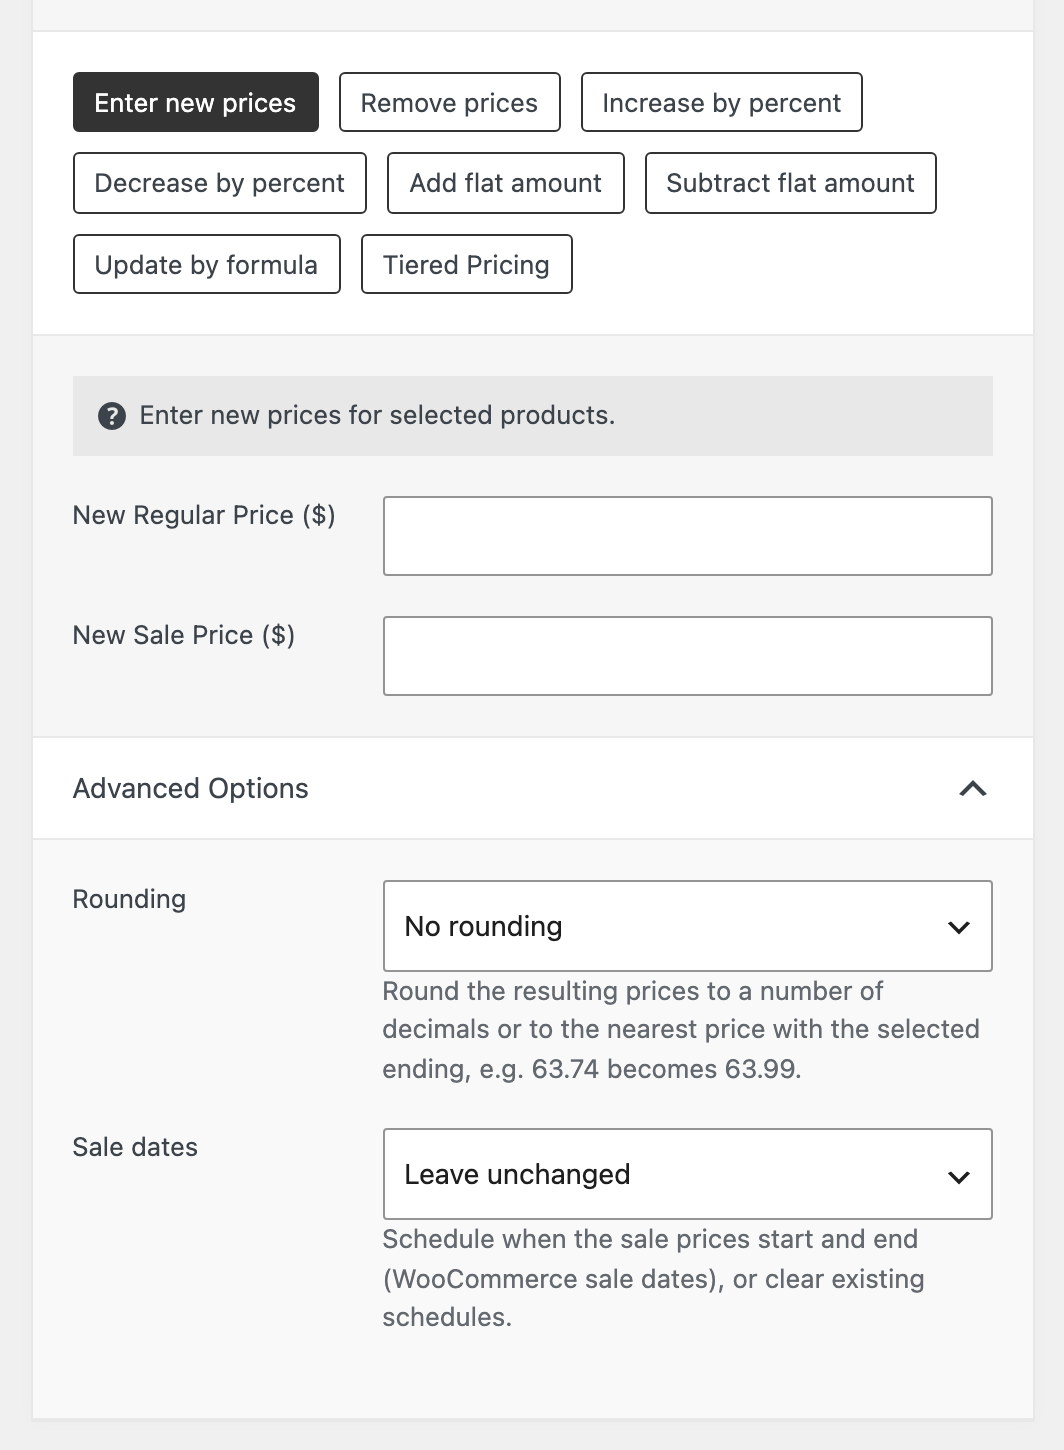
Rounding rounds each calculated result to:
- 2 decimals / 1 decimal — classic decimal rounding
- Whole number (.00) — round to whole units
- Price ending .90 / .95 / .99 — the nearest price with that ending, e.g. a calculated 63.74 becomes 63.99
Price endings are the quickest way to keep “charm prices” after a percentage change. Tip: Add flat amount with a value of 0 and a price ending selected works as a pure “round all my prices” pass.
Sale dates sets or clears WooCommerce’s own sale schedule on every selected product — the same “Schedule” dates you would otherwise enter product by product:
- Set sale dates — enter a start and/or an end date; leave one empty to keep that side of the schedule open.
- Clear sale dates — remove existing schedules, so sale prices apply immediately and indefinitely.
Sale dates can be applied on their own (with no price change) and are restored by a revert together with the prices.
Tiered Pricing
An extra tab that appears when the Tiered Pricing Table plugin is active — see Tiered Pricing Table Integration.
Step 3: Preview and Apply
The products table
The table shows every product matching your filters with the following columns: Image, Name (with SKU), Categories, Regular Price, Sale Price, Stock Status, Type, and Date.
- As soon as a price modification is entered, the price columns switch to a preview: current price → new price, with the new value highlighted in yellow. Products whose price would not change (for example, no sale price to adjust) show their current price only.
- Columns Name, Regular Price, Sale Price, Stock Status and Date are sortable — click a header to sort.
- Hover a product and click Price history under its name to see every recorded change of that product’s prices — see Price Change Tracking.
- The table is paginated (15 products per page by default, following your “Products per page” screen option) and updates over AJAX without reloading the page.
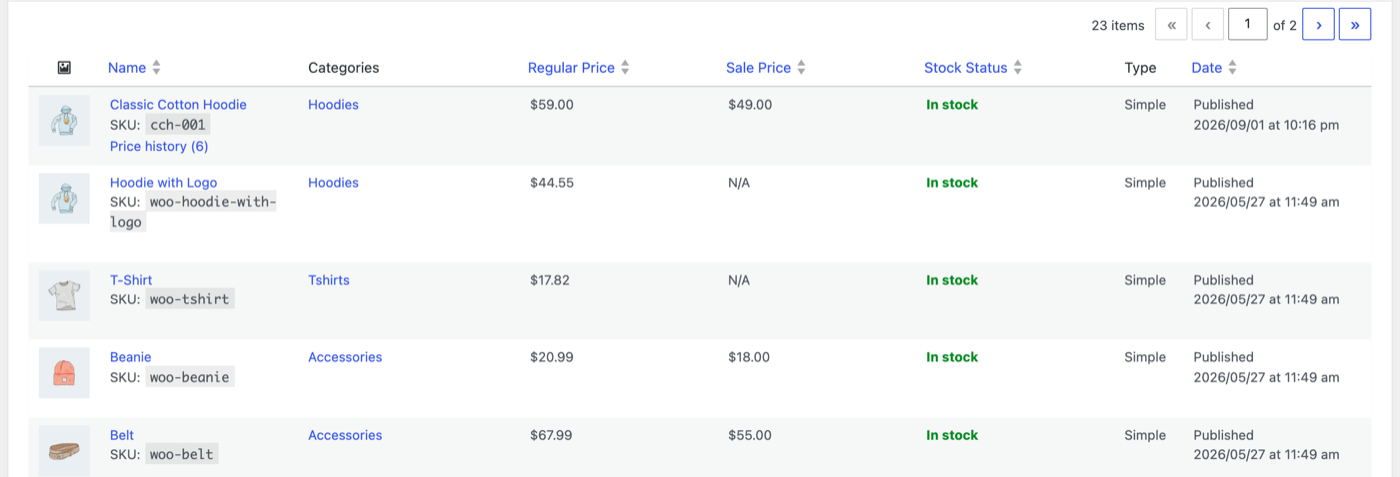
The preview is calculated by the exact same code that later performs the update, so what you see in the preview is precisely what will be saved.
Export CSV
The Export CSV button next to Apply changes downloads the full preview — every product matched by your filters (variations included), with its current regular and sale prices and the new ones the selected method would produce. Review it in a spreadsheet, share it for approval, or keep it as a record. Without a price modification selected, the export lists the current prices only.
Applying changes
Click Apply changes. The confirmation dialog tells you how many products will be affected and lets you choose when to run the update:
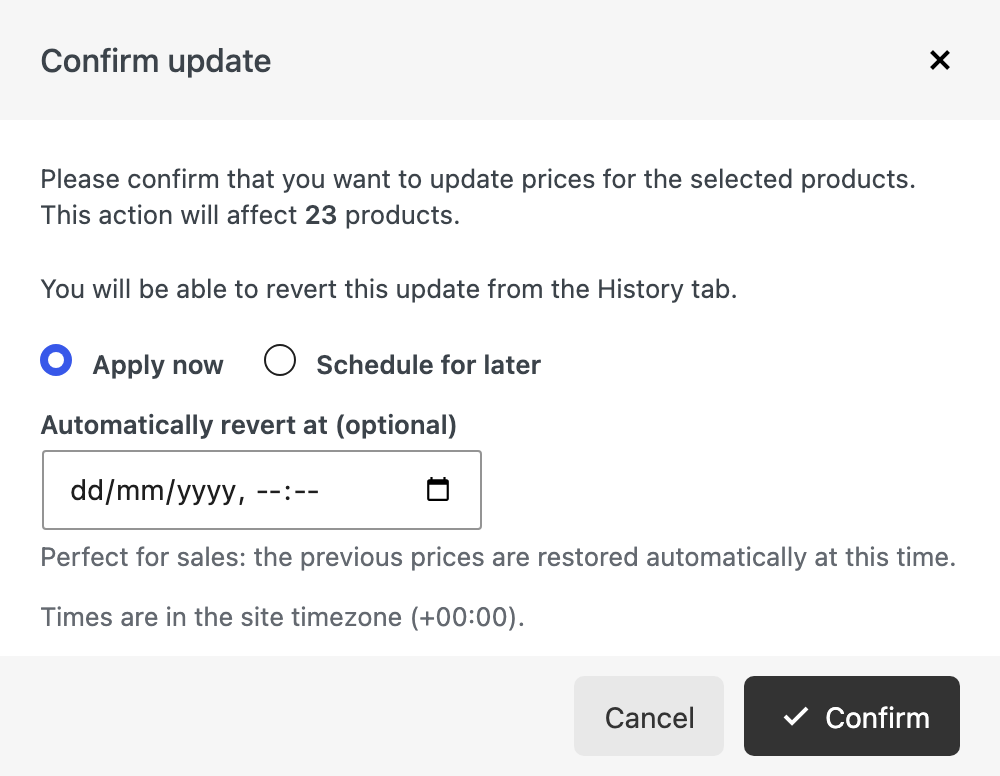
- Apply now — starts immediately.
- Schedule for later — pick the date and time the update should start; see Scheduling Updates.
- Automatically revert at (optional, for both modes) — the previous prices are restored automatically at the time you enter. A weekend sale becomes one action: start Friday evening, revert Monday morning.
Times are entered in your site’s timezone (shown in the dialog). The update always targets the full filtered set — not just the page you are currently viewing.
Background processing and progress
Products are processed in chunks of 100 using WooCommerce’s Action Scheduler, so even stores with tens of thousands of products are updated reliably without timeouts or server overload.
While an update is running, the editor page shows a progress screen with the number of processed products, a percentage bar, and two actions:
- View queue — opens the Action Scheduler screen filtered to the plugin’s pending jobs.
- Stop updating — cancels all remaining jobs. Products already processed keep their new prices; the rest remain unchanged. A stopped update appears in the History tab and can be reverted like any other.
The page refreshes automatically when the process completes, and a notification confirms how many products were updated.
Scheduling Updates
Choose Schedule for later in the confirmation dialog to run an update at a future date and time. The update is stored with its filters and price settings and appears in the Scheduled tab until it runs.

- The Products column shows how many products matched the filters at the time of scheduling (marked
~). The product list is resolved again when the update actually starts, so products added or changed in the meantime are picked up correctly. - Add an automatic revert time to have the previous prices restored later without any further action — the classic time-limited sale.
- Cancel removes a scheduled update (and its automatic revert) before it runs. The canceled entry stays visible in History.
- Scheduled updates run through Action Scheduler, so they need the site’s cron to be working — the same requirement as WooCommerce’s own scheduled actions.
Only one update processes at a time: if a scheduled update comes due while another one is still running, it starts as soon as the running one finishes.
Update History and Revert
Every bulk update is recorded in the History tab together with a snapshot of each affected product’s prices before the change. That snapshot is what makes the one-click revert possible.

Each entry shows when it ran and by whom, exactly what it did (for example Regular −15% · Rounding: .99), the filters it used with their values, how many products it changed, and its status. The actions on the right:
- Revert — restores the prices (and sale dates) of every product the update changed, using the snapshot. Only the fields the update actually touched are restored, so changes made since to other fields are kept. A revert is recorded as its own entry and can itself be reverted, which effectively re-applies the update.
- CSV — downloads the snapshot: every affected product with its prices before and after the update.
- Delete (trash icon) — removes the entry and its snapshot. The update can no longer be reverted afterwards.
Reverting runs in the background like an update, with the same progress screen. Updates that were stopped part-way can be reverted too — only the products that were already processed are restored. The history keeps the 50 most recent updates; older entries are removed automatically.
Templates and Reusable Jobs
If you run the same kind of update regularly (for example, a monthly sale for a specific category), save it as a template:
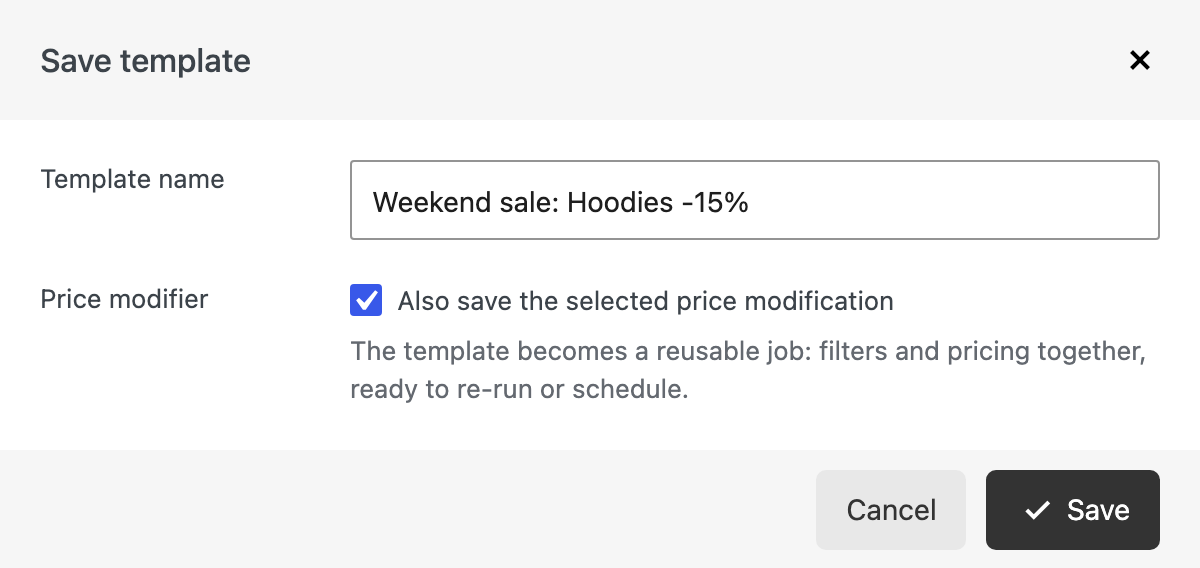
- Save as template — saves the current filter values under a name of your choice. Leave Also save the selected price modification checked to store the price method and its values too, which turns the template into a complete reusable job: filters and pricing together, ready to re-run or schedule.
- Select template — opens the list of saved templates. Selecting one pre-fills the filters — and, for a job, the price modification as well — instantly.
- Update template — while a template is active, adjust the filters or values and save the changes back to it.
- Remove — deletes a template from the list.
Templates are shared across all administrators of the site. The active template is part of the page URL, so you can bookmark one for one-click access. Saved jobs can also be run from the command line — see WP-CLI Commands.
Price Change Tracking
Independently of bulk updates, the plugin records every change to a product’s regular or sale price — whether it was made on the product edit screen, by an import, through the REST API, by another plugin, or by a bulk update — together with the date, the source, and the user.
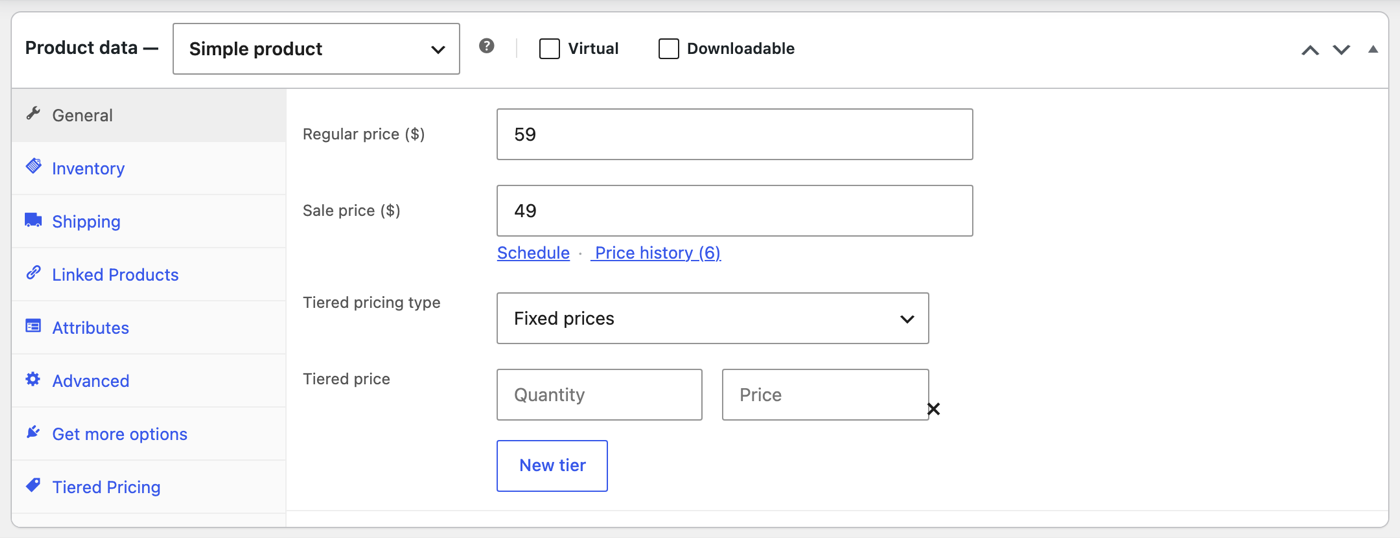
- On the product edit screen, a Price history link (with the number of recorded changes) sits next to the Schedule link under the sale price — and inside every variation’s pricing row, so each variation has its own history.
- In the editor’s preview table, the same link appears when you hover a product.
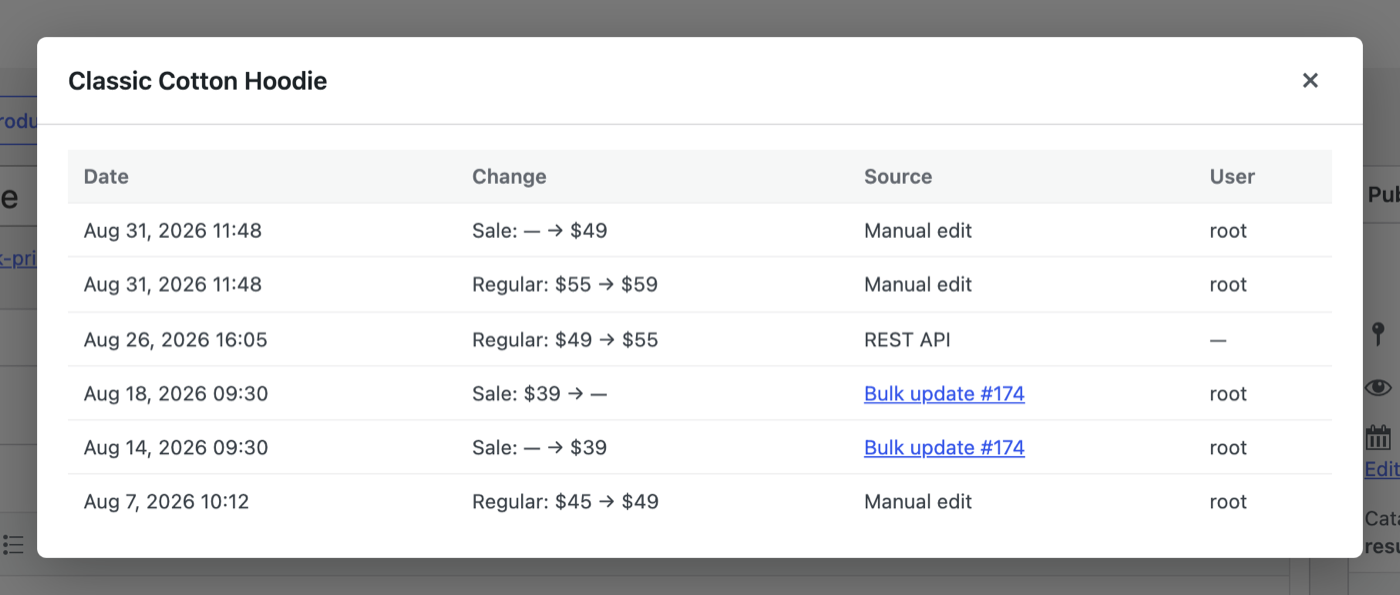
- The modal lists each change as before → after, with the source: a manual edit, the REST API, WP-CLI, or a link to the bulk update or revert that caused it.
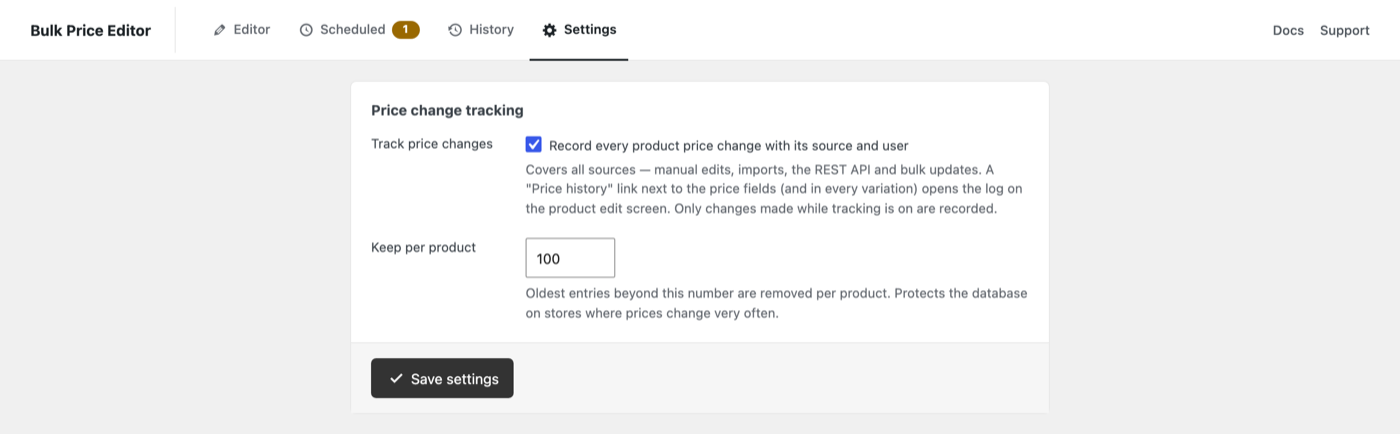
Tracking is on by default and can be turned off in the Settings tab, which also sets how many changes are kept per product (100 by default; the oldest are removed beyond that). Only changes made while tracking is on are recorded.
WP-CLI Commands
Everything the editor does can be scripted. The commands use the same code as the editor page, and their runs appear in the History tab with snapshots, so they can be reverted from either place.
# List saved templates (jobs)
wp bulk-price-editor templates

# Preview a job without changing anything
wp bulk-price-editor run --template="Weekend sale" --dry-run

# Run a job; --yes skips the confirmation
wp bulk-price-editor run --template="Weekend sale" --yes

# Run an ad-hoc update from filters and a modifier given as JSON
wp bulk-price-editor run --filters='{"bpe_included_category_ids":[15]}' \
  --modifier=decrease_by_percent --args='{"bpe_regular_price_decrease_by_percent":10}'

# Recent updates, and reverting one of them
wp bulk-price-editor history --limit=10
wp bulk-price-editor revert 42
Combined with a system cron, this is a simple way to run recurring updates — for example a job every Monday night.
Variable Products and Variations
There are two ways to work with variable products:
- Default (recommended): with the default product-type selection, each variation appears as its own row with its own prices — you see exactly what changes for every variation.
- Via the parent: if you enable the “Variable product” type and a variable product matches your filters, the plugin automatically applies the price modification to all of its variations.
Note: a variable product’s row displays its price range, and for percentage/flat adjustments the preview arrow appears on the variation rows rather than on the parent row — the variations are still updated when you apply.
Tiered Pricing Table Integration
When the Tiered Pricing Table plugin is active, Bulk Price Editor adds a Tiered Pricing tab to the price modification methods and a Tiered Pricing column to the preview table.
Set New Tiers
Define a new set of tiered pricing rules — Fixed prices or Percentage discounts per quantity — and apply it to all filtered products at once. Add as many quantity tiers as you need (minimum quantity is 2). Leaving the builder empty removes tiered pricing from the selected products.
Update Existing by %
Scale all existing tiered prices by a percentage: positive values increase them, negative values decrease them. Fixed tier prices are recalculated directly; percentage discounts are adjusted and capped at 100%. Products without tiered pricing rules are left untouched.
The Tiered Pricing preview column shows each product’s current tier table next to the resulting tier table, so you can verify the outcome before applying. In this mode regular and sale prices are never modified — only the tiered pricing rules, which is also why tiered-pricing updates are recorded in History without a price snapshot to revert.
Tips & Troubleshooting
- Something went wrong? Open the History tab and revert the update — the previous prices and sale dates come back. For very large stores a database backup before a big update is still cheap insurance.
- The update seems stuck. Background jobs run via Action Scheduler, which relies on site traffic/WP-Cron. Use the View queue button to inspect pending jobs under WooCommerce → Status → Scheduled Actions. The same applies to scheduled updates and automatic reverts.
- Prices didn’t change for some products. Percentage and flat methods skip products that don’t have the price being adjusted (most commonly: products without a sale price). Use Enter new prices or Update by formula to set prices on products that have none.
- Sale price higher than regular price? The plugin applies the values you enter as-is. WooCommerce will not display a sale price that is not lower than the regular price, so double-check the preview when adjusting both.
- A scheduled update ran on more (or fewer) products than expected. The product list is resolved when the update starts, not when it was scheduled — the number in the Scheduled tab is an estimate from the time of scheduling.
- Need help? Contact support — or open a ticket on the wp.org support forum if you use the free version.